Installing Mac OS X 10.4.7 on VmWare
Apple Mac OS has always fascinated me BUT I could never have it. It has never been affordable for me to buy an Apple desktop/laptop.
Since Apple switched to Intel, my quest for Apple Mac aroused once again. Later on I came to know about few guys who have been releasing patches to allow Mac enthusiast like me to install Mac OS X 10.4.x on Intel based PC/laptops.
Here I am going to talk about few necessary steps that would help you to get going with Mac OS 10.4.7 on your windows machine.
DISCLAIMER:
I am not endorsing the breaking of copyright laws and I write this solely for the purpose of education. I also do not take responsibility to what may happen to your computer.
Sometimes to fullfil our dreams, we need to get a bit dirty. Do we not? ;-)
Step1:
Get a prepatched Mac OS X 10.4.x install image. I used Mac-OS-X-10.4.7-AMD.Intel-(JaS)-ISO-Repack. Dig through some torrent sites and you will surely find it.
Step2:
Purchase/Download VmWare & Install it. I have used VMWare Workstation 5.5.
Step3:
Mount the ISO downloaded in step1. Make the image available for use to virtual machine. We can use VmWare to mount the image as VmWare has the ability to mount CD/DVD images. You can use Alcohol 120% or Daemon tools to mount the ISO as well.
Step4:
Create new virtual machine.
- Start Vmware workstation.
- Click on the "File->New->Virtual machine"
- Select "Custom" on 'Select the Appropriate Configuration' page & click 'next'.
- Select 'Appropriate Virtual Machine Format'.
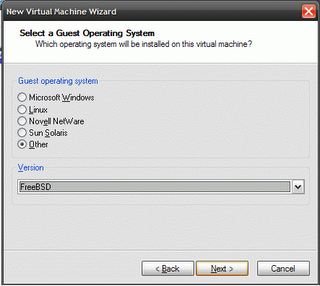
- Select "Other->FreeBSD" on 'Select a Guest Operating System' page.

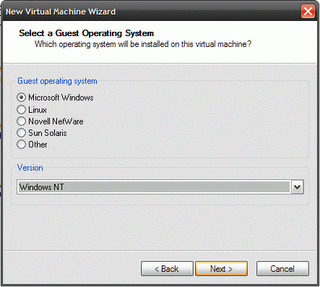
- If you have Core Duo or Core 2 Duo processor select "Microsoft Window->Windows NT", otherwise you will not be able to boot from the ISO.

- Click 'Next' & on 'Name the Virtual Machine' page set the machine name to whatever you like.
- On 'Processor Configuration' page select Number of Processors to One. If you select Number of Processors to Two, your Mac OS installation may hang on the first boot screen. Once the installation is complete, you can change the number of processors to Two. It worked for me. Click 'Next'
- Specify the amount of memory allocated to your virtual machine on the 'Memory for the Virtual Machine' page. Click 'Next'
- Select "Use host-only networking" on 'Network Type' page. This should prevent Mac OS from registering itself when it starts first time.
- Select appropriate adapter type on 'Select I/O Adapter Types' page & click 'Next'.
- Select "Create a new virtual disk" on 'Select a Disk' page & click 'Next'.
- Select Virtual Disk Type as IDE on 'Select a Disk Type' page & click 'Next'. If you don't select IDE, you will not be able to boot into Mac OS X. Installation will hang as well.
- Specify atleast 6 GB of disk space. And select Allocate all disk space now on 'Specify Disk Capacity' page.
Edit your vmware config. Open your virtual machine configuration file (.vmx extension) in any editor and add the following line at the end of the file.
paevm="true"
Step6:
Install Mac OSX
- Start your virtual machine.
- On boot prompt hit F8 to add boot options.
- Type "-v" and hit enter. This will start installer in verbose mode.
- Be patient, it may take a long before you see a installation GUI.
- When you reach to a place where you need to select hard disk but nothing is listed, open "Tools->Disk Utility" from menu available on top of your screen. Select your Mac Os partition and click "partitions" from options available on right pane of the dialog. Create a journal partition to utilize the entire disk space. When you are done with this partitioning close the disk utility. Now, you should see your drive in the setup page. Select the partition and press "Next".
Next, select custom installation and select all available patches. If you want to save disk space, remove unnecessary printer drivers from the installation list. Also remove unnecessary language options. Important: De-select wireless driver from custom patch list. Else your Mac will hang on the next boot with an error "no airport driver found".
Step8:
Have a nap. When you wake up, you will see you are done with installation. Voila! you have your Mac OS X ready to play with. Enjoy.
I am also trying to install Mac OS X 10.4.7 on physical partition under native mode. Will post my experience on it very soon here. Meanwhile, stay tuned.
Let me know if I can be of any help. Catch me on nightr0ver at yahoo dot com
No comments:
Post a Comment